Designing a Map
It has been said that the best special effects are the effects the audience doesn’t see.
This perfectly describes the process of designing the overworld map for Aethermon – the design must fulfill a large range of mechanical and artistic requirements without feeling engineered to meet those requirements.
Hopefully most players will never stop to wonder how carefully each square has been placed.
Nevertheless I am going to break it down for our keen readers here.
Typically players will progress from the bottom to the top of the map.
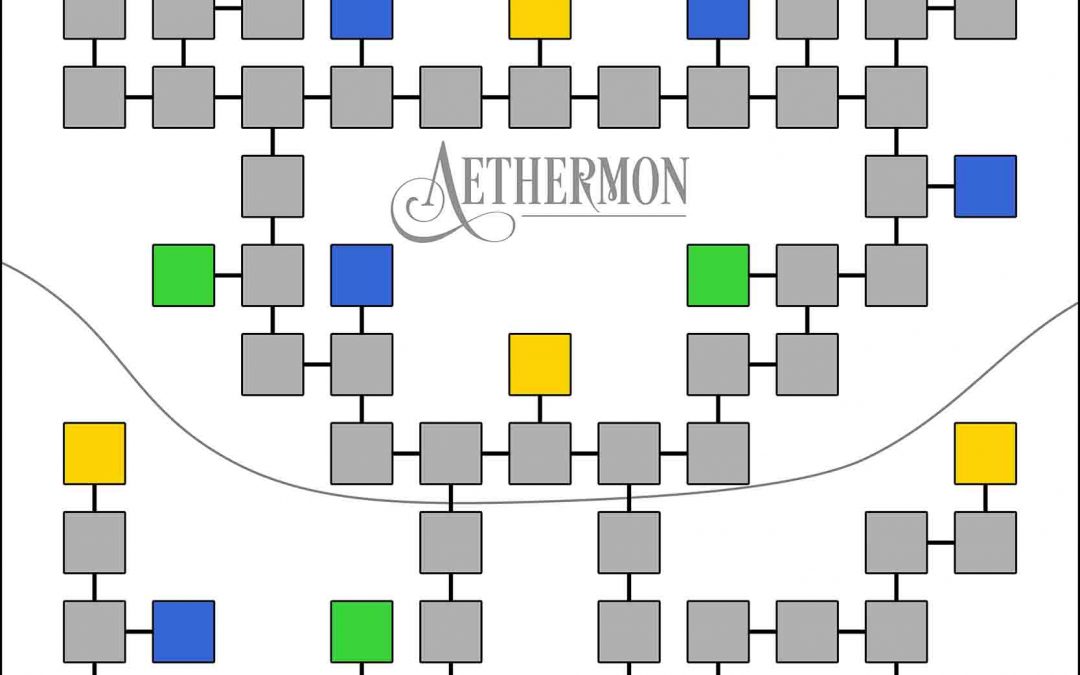
To provide context let’s start with a key:
- Grey Squares – Generic Encounters – players will encounter either an enemy of appropriate level or a special character on each of these squares
- Green Squares – Healing Spots – they heal
- Blue Squares – Quest Locations – players go here to get quests, continue existing quests or complete quests
- Yellow Squares – Major Objective – Dojos holding bosses, starting and ending squares etc.
A number of rules exist to make the artwork for the map easier.
- The space above each coloured square must be free for artwork
- No coloured square should be adjacent in any direction another coloured square
- There are no 4 way intersections
- All transitions between areas must be vertical (works best for a top-down oblique perspective)
In addition to these requirements, for mechanical reasons these additional rules must also be followed
- All Grey squares must be within 6 distance of a Green healing square (this is the maximum distance a player can travel on one turn)
- All Yellow squares must be exactly 7 distance from their nearest Green healing square (ensuring players cannot travel directly from a healing square to a boss encounter, while also giving players the most 2 card combinations to travel that distance)
Furthermore the map needed to be designed with a top vs bottom symmetry for some of the advanced playmodes.
- Both the top Yellow Square (Top’s starting location) and the bottom Yellow Square (Bottoms starting location) are exactly 14 squares from their nearest Dojo (the top right yellow square is not a dojo).
- The most center Yellow Square is exactly 12 distance from each of the 5 Dojos (the 5 closest Yellow Squares).
- Whether taking the left route or the right route, both the top and bottom starting squares are exactly 20 squares away from the centre Yellow.
I’ll be honest, I wrote this one mostly for me, for everyone who has read this far – Thank you.
Stay Strong AetherRen